| Search results - "case" |

14 Manual Transmission Transaxle, Clutch and Transfer Case18 views14 Manual Transmission Transaxle, Clutch and Transfer Case
|
|
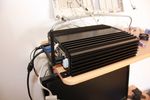
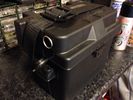
81 viewsCarPC closed and ready for mounting. Note the modification to the rear of the case to allow extra USB sockets attached to the motherboard pins.
|
|

Terratrip 202 V4 possible discrete location140 viewsAttached to ashtray - allowing removal / unplugging when not in use by pulling out the ashtray.
Terratrip is an odometer for use in rallies / raids - very popular with the French when used in conjunction with a roadbook. A mechanical backup in case GPS signal is lost on modern odometers like the Globe 800 I propose to use.
We'll see if there are reflection issues from the screen.
|
|
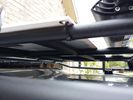
solar panel install356 viewsAt least at this point, I mounted it by using Clear Silicone RTV. This stuff is kind of like glue, but can be removed. If it doesn't hold up after curing and driving, I'll remove it and come up with another plan. I used heavy cable ties on the 4 grommets, in case it lets loose, it won't take out my wiring and the car behind me. 2 Panels are dandy like this, but I don't want to permanently block the roof space. Grape Solar to power my snomaster fridge
|
|

3D Printed Samsung Galaxy S5 Phone Mount21 viewsDesigned to fit a Brodit Clip Mount (in this case one for an Isuzu DMAX)
|
|

Thread upload16 viewsImage uploaded in new thread
|
|
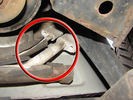
Air Conditioning Pipes (File 1)983 viewsIt\'s the smaller of the 2 pipes that is leaking. Both pipes are encased full length in the foam sleeve. You can see where the support bracket has \'crushed\' the sleeve. The bracket is what holed the small pipe. There is a bracket at each end and one in the middle. You need to remove the suspension reservoir to get to the centre bracket. Be aware that the bolts securing the brackets may be corroded and are likely to shear off on removal!
|
|
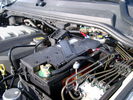
BCI Group 40R Deka 640RMF battery showing vent hose run forward to windshield washer reservoir area 1430 viewsRecessed post "Euro profile" battery to "match" OEM and stock Land Rover bracket; note that the Traxide SC80-LR module is mounted at an angle to allow for the main cable to sit under the cover so cover still closes.
The battery is a nominal 7", (180mm), high, but sits on a 1" battery spacer set under to raise the bottom front end of the battery such that the approx 11", (290 mm), length of the BCI 40R battery rises above the angled plastic nibs at the forward end bottom of the case front; hence sufficient space, (1/4", 5mm) remains at the brake reservoir end.
Also the 40R battery does not have hold down "flanges" on each end; on the sides yes, but not the ends so no additional length is required.
When I had to replace the 40R, this time I installed the shorter, (9.625"), taller, (7.5") Interstate BCI 47 / DIN H5 battery which eliminated the spacer on the bottom and better fit the stock LR tie down bolt lengths. Deka also has a BCI 47 / DIN H5 that would work fine as well.
|
|
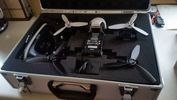
Parrot Bebop 2 Drone in case32 views£30 maplin case for Parrot Bebop 2 and Sky Controller 2
|
|

Thread upload14 viewsImage uploaded in new thread
|
|

30 views
|
|

Bin cover removed to expose plastic moulding covering buzzer.10 viewsI guess this moulding is helping to retain the bin cover when in place rather than to "protect" the buzzer but that is also what it seems to do. In any case, unscrew the two large screws and lift moulding off exposing the buzzer.
|
|

BN with Blooming Suitcase260 views
|
|

Thread upload24 viewsImage uploaded in new thread
|
|

bullet proof case39 views
|
|
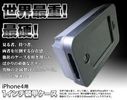
bullet proof phone case35 views
|
|

Thread upload14 viewsImage uploaded in thread 17923
|
|

Thread upload17 viewsImage uploaded in new thread
|
|

COMM FAILURE in the Faultmate FCR79 viewsThis is ONLY shown if either you have a communication error or in most cases you dont have fitted on your car the module you are trying to communicate with.
|
|

Transfer Case Draining and Filling.pdf181 views
|
|
Thread upload16 viewsImage uploaded in new thread
|
|
Thread upload15 viewsImage uploaded in new thread
|
|

Thread upload2 viewsImage uploaded in thread 123654
|
|

Thread upload2 viewsImage uploaded in thread 123654
|
|
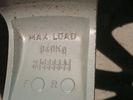
940 kg load marking on inside of spoke419 viewsThis is a typical 940 kg load marking on a Cromodora wheel rated for the 3. In this case, the wheel is the 6 spoke 19" wheel common to the HSE, LR Part # ALY72191U.
|
|
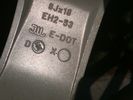
E-DOT and Japan wheel acceptance marking on ten spoke wheels.335 viewsThese are the E-DOT and Japanese wheel acceptance markings on the inside of one of the ten spokes of the 8J x 18" wheel, Land Rover part number ALY72190U or RRC500250xxx where xxx is the colour number, in this case, MNH for Sparkle Silver. There are similar markings on all Cromodora wheels for the 3.
|
|

Just in case the D3 scrabbles about a bit!115 views
|
|
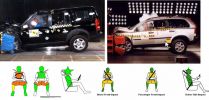
D3 vs. XC90 in NCAP test416 views Actually D3 has more green color for the passanger as XC90 (that got 5 star marking). So if you really love your wife, D3 is safer to her in case that you are driving and she is a passanger :=)
|
|

Deka Battery Dimension Data615 viewsThe battery size that I installed for my auxiliary was a BCI 40R battery as it was for me the easiest to fit and was also a cranking battery. The case profile was such that no tie down fins were located on either bottom end, (sides yes), and length wise, it was only about 11" (290 mm) long. As such, I did not have to grind the nibs at the front bottom of the plastic surround.
I did however raise the bottom of the battery above the angled nibs as I set the battery on a 1" (25mm) high plastic spacer. The total height, (battery plus spacer), was about 8" (200mm) so the battery top still fit under the Land Rover factory cover.
For the Aux battery, when I replaced the 40R, I installed an Interstate BCI 47 which is similar in size to a DIN H5. I was therefore able to eliminate the vertical spacer as the Group 47/H5 is the same height as the DIN H7/H8 stock LR spec starting battery. As such, the standard battery tie down bolts can be used without modification. The Group 47 battery is 9 11/16" long x 6 7/8" wide x 7 1/2" (190mm) high.
|
|
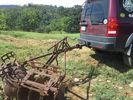
LR3 to plow your garden298 viewsI found this jpg where a current LR owner is using his LR3 for a similar purpose as the original Series units were designed to do - that is serve as a tractor for plowing a field or I suppose a garden.
In this case, I note the hitch is one of those that attach to the factory tow loop, (Rhino Hitch), rather than the factory product that inserts from the bottom and hangs down - (like a plow), but all the time. One of the other jpg's in this album shows the two factory variations plus a third jpg shows a closeup of the Rhino Hitch.
|
|
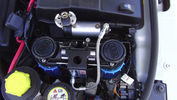
ARB CKMTA Twin Compressor180 viewsTwin Compressor with Manifold and Airtank. Tight fit but it fits. Also the ECU Chip is at the back and below up against the battery case.
I changed the hose quick release to a standard Air Hose Fitting eg like a workshop would use. My other truck has those also.
|
|
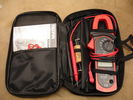
Tecpel DCM-033 DC clamp case and probes29 views
|
|

No one about .. Left it running .. just in case ... LRA would take awhile !164 views
|
|

Thread upload16 viewsImage uploaded in new thread
|
|
Thread upload22 viewsImage uploaded in new thread
|
|
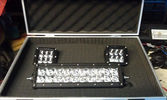
Dually D2s and 10 INCH E Series light bar in a presentation case74 views
|
|

Close up - key removed18 viewsIn the center is the added switch with removable key.
Here the key is removed.
This is to add an additional 'protection' from discharging the auxiliary battery in case other people are working on the car and accidentally switches on any electrical bit :)
|
|
38 viewsWhen adding two single DIN supports together, you get quite a gap at the front.
This gap was way too much in my case, as it turned out that both supports started to bend when putting them both in the facia. Not that good, so I decided to cut off the upper part of the lower DIN support.
|
|

Ipad case9 views
|
|
33Ah leisure battery in ABS case with Fused 12v socket48 views
|
|
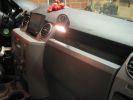
433 viewsA glimpse of the final installation, with a working map-reading light. In case the GPS doesn't work ;p
This is an old picture as the touchscreen is removed already.
However, I kept the reading light.
|
|

Transfer case control module31 views
|
|

Staircase149 views
|
|

Staircase155 views
|
|
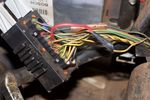
Can bus wiring repair19 viewsprevious owners repair to a can bus wire near the transfer case module
|
|
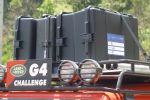
Storm Force Cases156 views
|
|

15 views
|
|

Key Fob with new case40 viewsMy new looking key!
|
|

L319 - The Design Case Study29 views
|
|
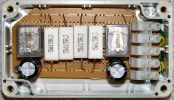
All the components assembled ready for wiring.830 viewsThe 5watt resistors get fairly hot, be careful not to have them touching the relay case or use a larger box for yours.
|
|
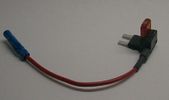
Littelfuse Mini Add-A-Circuit FMH200BP and OFH0200ZP1623 viewsFound this jpg somewhere on the forum - others are using them as it is a good way to tap the fuse box to add a fused circuit, or in this case, to modify a circuit to add a switch such that the fused circuit is switched. In my SmoothTalker gallery, there is a PDF from Littelfuse specifically related to this Add-A-Circuit device.
Before you install the Add A Circuit for any application, take an ohm meter and trace out the circuit path of the two pair of slots that fuses could insert into. The path is more complicated than one might first think. As such, the orientation of the fuse holder in the socket may matter depending upon the application. If the application is a circuit diverter, (as the F35 mode is), as opposed to a mere accessory adder, orientation matters.
|
|
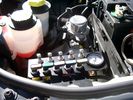
View of mounted panel from front left side878 viewsNote that all valve handles are shown in the OFF position, (the trouble position). In this case, the air that is in the air springs, (if any), is trapped in there - that is the valve blocks cannot vent whatever air is already in the air springs as the air lines between the springs and respective valve blocks are closed off by the FASKIT valves. In operation, there may be only trouble with one air spring, (perhaps a wheel height sensor), and as such, only one valve would need to be closed. If there was complete air compressor failure, then all valves would be closed and then as required, each spring could be manually filled from an outside clean dry oil free air source.
|
|
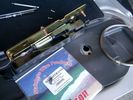
0.032" OD metal fishing leader and lead fishing weight clamped to existing wire rope 2121 viewsI used a size #0 lead fishing weight as a clamp to attach the 0.032" diameter flexible wire rope fishing leader to the release cable.
The pictured weight is the smaller #00 weight, however it did not work very well so reinstalled with the larger #0 size. I clamped to the cable as what breaks is the L retainer that is hidden in the actuator and holds the cable. When the L breaks, it lets go of the cable so you hear the clicking but there is no opening action.
Clamping on to the cable is an attempt to resolve that reality; also if the actuator electrically fails, the release mod should still do the task. Note in the picture the two Torx T15 screws that hold the gold plate to the plastic case and also the two 8mm cap screws that have to be loosened to remove the actuator from inside the door.
|
|

solo steep gravel stop = park brake plus reverse on shifter333 viewsso our disco II\'s locked all 4 wheels with brake but now the modern lr3 slides away with only the park brake!!!! 1. put auto shifter in reverse (low gear) with foot on brake, 2. apply park brake, 3. get out and snap photo incase something fails and it slides away ;)
I reversed up the hill from this position, system decided to engage extended heigh mode for some reason trying to gain traction on loose surface.
|
|

Engine and Transmission Electronic Controls Wiring Diagram996 viewsThis 20 page pdf shows the wiring for the electronic controls for the engine, transmission and transfer case.
|
|
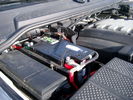
Main starting battery showing 1/2" hole drilled for power cable egress910 viewsView of OEM battery in Left Hand Drive LR3. This is supposed to be a Battery Group BCI 49 or H8 sized battery but in reality is the slightly shorter BCI 94R or H7 battery that fits easier lengthwise, (12 3/8" vs 14").
Note the 10mm hole drilled in plastic of surround to allow for entry of main power cable that runs between batteries. The cable bolts to a spare 6mm threaded hole in the OEM battery cable end; the light gauge wire runs to the front of vehicle to a connector for the CTEK MULTI US 3300 charger. Coloured felts, (red and green), are a material treated to reduce battery post corrosion. The OEM battery ground cable is only about a foot long and runs to an 8mm stud located on the inner fender just to the rear of the fuse case.
|
|

I rest my case25 views
|
|

3 Button Key Fob Case46 viewsReplacement case for 3 button Key Fob (Disco 3 & RRS 2005-2009)
|
|

Fingal Road - Northern end187 viewsOnly sand driving we did was on this well packed and still damp sand leading to the sand pumping station (used for erosion control). Didn't even need to select Sand mode from the terrain tamer although I did put it in Extended Mode just in case.
|
|

How many cases can you fit into a D3/LR3?228 viewsCurrent advert in Australian print media shows 30 cases packed in!
|
|

16 views
|
|
13 views
|
|

Redundant Parts977 viewsThese are what you are left with once the EGR blanking kit is installed. Best to hang onto them in case you need them again!
|
|
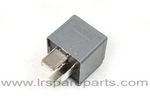
Air Compressor 70 amp replacement relay1393 viewsThere is a software update, 09 April 2010, LTB00270, for the compressor which reduces the shut down pressure to about 205 psig (14 bar). The update is usually done when changing to a new compressor and also includes replacing the R7 relay in the engine compartment fuse box, 07 DEC 2010 LTB00331.
The newer grey case coloured relay, part # YWB500220, shows to be rated at 70 amps, (the relay, not the compressor), however the previous black case coloured relay also indicates 70 amps.
Both the new and replaced relay show on their wiring diagrams to have a parallel voltage spike resistor, (probably 560 ohms), across the coil terminals, #1 and #2. This means one does not just replace the relay with any four prong 70 amp ISO sized relay that one happens upon.
One presumes the grey relay is either upgraded or just being installed for good measure. The relay is common on Ford Fiesta for the seat heater relay, Ford part number 5M5T 14B 192 EA; also Volvo, part number 30765034. The Tyco part number moulded on the grey body is V23136-J4-X62.
|
|
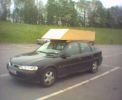
DIY roofbox239 viewsNo, it\'s not a bookcase on a vectra - it\'s a home-made roofbox. Eat that, Halfords!
|
|

Signs you see126 viewsI can't imagine many people wanting to eat potting mix, but just in case, this supplier wanted to cover their options and ensure that no one ate and sued as a result of thinking that you could eat potting mix.
|
|
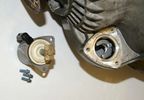
Hi/Lo TCase solenoid4 views
|
|

5 views
|
|

Thread upload7 viewsImage uploaded in new thread
|
|
Thread upload8 viewsImage uploaded in new thread
|
|
Thread upload9 viewsImage uploaded in new thread
|
|

Thread upload9 viewsImage uploaded in new thread
|
|

Thread upload10 viewsImage uploaded in new thread
|
|
Thread upload8 viewsImage uploaded in new thread
|
|
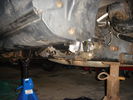
74 viewshttp://www.disco3.co.uk/gallery/albums/edit/preview_480c9783.JPG
|
|

Transfer Case Draining and Filling.pdf809 views
|
|

Transfer Case Specifications.pdf600 views
|
|
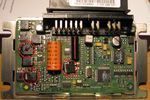
transfer case control module71 viewsPicture shows blown components of the Transfer Case control module after water ingress over time - with a healthy top up from over-enthusiastic lad with a high pressure water hose in the car wash!!!
|
|

Thread upload3 viewsImage uploaded in new thread
|
|

Thread upload7 viewsImage uploaded in thread 206795
|
|
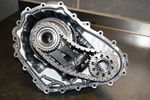
Thread upload5 viewsImage uploaded in thread 145153
|
|

Thread upload0 viewsImage uploaded in thread 188874
|
|

Transfer_Case_Draining_and_Filling36 views
|
|

Thread upload1 viewsImage uploaded in new thread
|
|
Thread upload0 viewsImage uploaded in thread 188874
|
|

Thread upload0 viewsImage uploaded in thread 208043
|
|

500 views
|
|
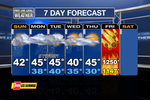
12/21/2012 Weather Forecast143 viewsEnjoy.. too funny
|
|
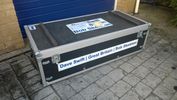
Flight case 211 views
|
|
Flight case14 views
|
|

Flight case 315 views
|
|

Thread upload3 viewsImage uploaded in new thread
|
|

Thread upload2 viewsImage uploaded in thread 125790
|
|
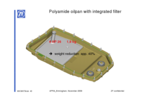
ZF_6HP26_Plastic_Filter_Pan_ combo.png1103 viewsThis is the plastic oil pan on the bottom of our ZF 6HP26X transmissions. Note the two round magnets at the right end of the pan; the drain plug is between them. The filter is the grey part and the vertical oil suction pipe is to draw oil up to the transmission from the filter element. There are 21 Torx screws around the perimeter and the pan gasket is O ring like in design where a half round channel is moulded into the plastic of the pan. The metal pan uses a more conventional flat gasket and in both cases, the metal mating surface of the transmission case is a flat machined metal surface.
|
|

Mechatronic Replacement Hints plus drains for steel and plastic pans1111 viewsThis 22 page pdf shows colour views of the Mechatronic unit as well as good illustrations of the drain and fill ports in both the plastic, page 17, and steel pans, page 18.
Page 8 details the replacement of the sealing sleeve where the electric wire feed thru the case into the Mechatronic unit. The seal is normally replaced when a new pan is installed as the seal is a known leakage point.
|
|

Thread upload14 viewsImage uploaded in thread 187861
|
|
|
|