| Search results - "maintenance" |
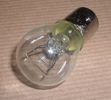
Land Rover Stop Tail Light dual filament bulb nominal 12 volt 21 / 5 watt filaments1427 viewsThis is the Land Rover part number 264590 dual filament bulb, (P21/5), that inserts into the upper two tail lamp receptacles. In the upper one, both filaments function, in the lower one, only the 5 watt tail light filament functions.
I regard it as not a good practice to routinely switch bulbs when the tail light filament, (5 watt), burns out on the lower bulb. The broken filament can jiggle over onto the brake light filament, (21 watt), and short the circuit to ground or something else not predicable.
There are also arguments to say that quality control is better on the Land Rover marketed bulbs than say far east sourced bulbs. Filament construction, and hence resistance can vary and mislead the current sensing circuits monitoring the signal light systems. Also when the bulbs are properly installed, all filaments should be standing vertically and not at any slope.
These are the sort of obscure circumstances that can lead to false trouble messages on the display, dropping to the stops, and subsequent concerns - all over a tail/signal light bulb.
For example, the filament life of both the tail light and the brake light filaments in the P21/5 bulb is significantly less than the USA common 1157 dual filament bulb, (1000/250 vs 5000/1200 hours); brightness in the P21/5 is a bit more, (3cp/35cp vs 3cp/32cp where cp is candle power), but current consumption is oddly less, (0.44a/1.86a vs 0.59a/2.10a where a is amps). It is the quest for efficiency vs maintenance trade off.
|
|

2 Maintenance Schedules - Gasoline Engines17 views2 Maintenance Schedules - Gasoline Engines
|
|

3 Maintenance Schedules - Diesel Engines12 views3 Maintenance Schedules - Diesel Engines
|
|

24 views
|
|

Brake Light Switch, Find, Remove, and Install Instructions 7854 viewsThis is a two page doc outlining where to find the brake light switch, how to remove it, and then install the new one.
Note, do not move the brake pedal when removing or installing the switch. Let the brake pedal hang where it wants to. The switch design is actually cunning, and as such is supposed to make the removal and install fool proof. Hence if you think too much about it, you can wreck the new switch.
If you want to inspect the interior of the switch, wait until you have removed the old switch. You can then just unsnap the blue from the white to get it apart. Inside, the switch is quite simple, (no circuit boards), but it will probably show black dust from failing contacts.
I think the reason the switch fails is that the Normally Open, (NO), contacts of the brake light contacts were made too light to carry the current load for make and break of the tail light filaments. I also think the black dust created then fouls the Normally Closed, (NC), second set of contacts for the ABS circuit. As such, the Normally Closed contacts become intermittent in operation and display as a fluctuating open and closed circuit condition to the ABS system when the ABS should be seeing a steady closed circuit. Hopefully the replacement switch contacts are more robust and may be as I recently replaced my switch again just as a matter of maintenance. While in a redesign, ideally the NC contacts should be sealed or at least separated from the NO contacts, when I inspected the removed switch, this time there was no black dust present.
Probably the removed switch will have a Land Rover oval logo moulded into it, the new one, FOMOCO.
|
|

84 views
|
|

76 views
|
|

Maintenance Check Sheet Arduous 3.0 TDV6 Models to 11MY Discovery 4 / LR424 viewsMaintenance Check Sheet Arduous 3.0 TDV6 Models to 11MY Discovery 4 / LR4
|
|

Maintenance Check Sheet Rest of World 3.0 TDV6 Models to 11MY Discovery 4 / LR418 viewsMaintenance Check Sheet Rest of World 3.0 TDV6 Models to 11MY Discovery 4 / LR4
|
|

Maintenance Check Sheet All Models UK & EU to 11MY Discovery 4 / LR412 viewsMaintenance Check Sheet All Models UK & EU to 11MY Discovery 4 / LR4
|
|

Maintenance Check Sheet All Models UK & EU Discovery 416 viewsMaintenance Check Sheet All Models UK & EU Discovery 4
|
|

D3 Maintenance Schedule - Kilometre version130 views
|
|

170 views
|
|

Italian Maintenance Check Sheet251 viewsLRE008ITA (2)
DISCOVERY 3 SCHEDA DI CONTROLLO MANUTENZIONE (TUTTI I MODELLI INGHILTERRA & EUROPA)
|
|

Italian Maintenance Check Sheet228 viewsLRE011ITA (2)
DISCOVERY 3 SCHEDA DI CONTROLLO MANUTENZIONE (TUTTI I MODELLI PER CONDIZIONI GRAVOSE)
|
|

Italian Maintenance Check Sheet139 viewsJLR 11 81 14_7E (7)
DISCOVERY 3 SCHEDA DI CONTROLLO MANUTENZIONE (TUTTI I MODELLI RESTO DEL MONDO)
|
|

service183 views
|
|

Disco3 Maintenance Checklist28 views
|
|

Thread upload28 viewsImage uploaded in thread 132681
|
|

Maintenance check list282 views
|
|

LR4 2012 MY Maintenance Schedule18 viewsLR4 2012 MY Maintenance Schedule
|
|
D3_ Maintenance21 views
|
|

Interstate Battery Dimension sheet642 viewsThis sheet is hard to find - the sheet is not on the Interstate corporate web site but some dealer web sites display it. The pdf shows most of their available batteries including the H7 and H8 sizes that are the LR North America replacement batteries for the main starting battery. These batteries are of the Land Rover desired "shallow" cycle high discharge current Maintenance Free, (Ca Ca), internal construction, (not AGM, but instead, Wet Flooded Lead Acid with battery "caps" and Ca grid separators).
For the AUX battery , the H6, (BCI Group 48), is probably similar in dimensions to the Varta E12V75N that is popular in Australia. For that battery to fit in the second battery compartment, you must grind out the angled nibs on the inside front bottom of the LR black plastic surround, something I did wish to do and hence installed a Group 40R on a spacer. Alternately, one can choose an Interstate BCI Group 47 which is similar to a DIN H5 for the AUX location. I did this when I had to replace my 40R. No vertical spacer is required and the stock battery tie down bolts and clamp work well.
|
|

Discovery 3 Maintenance Check Sheet (All Models Rest of World) - miles183 viewsDiscovery 3 Maintenance Check Sheet (All Models Rest of World) - miles
JLR 11 81 10_7E
|
|

Discovery 3 Maintenance Check Sheet (All Models UK & EU) - miles214 viewsDiscovery 3 Maintenance Check Sheet (All Models UK & EU) - miles
JLR 11 82 10_6E
|
|

Discovery 3 Maintenance Check Sheet (All Models Arduous) - miles155 viewsDiscovery 3 Maintenance Check Sheet (All Models Arduous) - miles
JLR 12 05 10_6E
|
|

L319_Discovery_4_MY2010-2011EU_Maintenance_Check_Sheet_-_all_Models_-_km34 views L319_Discovery_4_MY2010-2011EU_Maintenance_Check_Sheet_-_all_Models_-_km
|
|

D4 non-3L arduous maintenance checklist29 views
|
|

Maintenance Check Sheet Non 3.0 TDV6 Models To 11MY Arduous Discovery 4 / LR412 viewsMaintenance Check Sheet Non 3.0 TDV6 Models To 11MY Arduous Discovery 4 / LR4
|
|

Maintenance Check Sheet Non 3.0 TDV6 Models To 11MY Rest Of World Discovery 4 / LR417 viewsMaintenance Check Sheet Non 3.0 TDV6 Models To 11MY Rest Of World Discovery 4 / LR4
|
|

D4 non-3L maintenance checklist (rest of world)29 views
|
|
Maintenance Check Sheet66 viewsMaintenance Check Sheet
|
|

Maintanance Disco 357 views
|
|

Maintenance Fluid Specifications for Legacy LR Vehicles176 viewsMaintenance Fluid Specifications for Legacy LR Vehicles1
|
|

Thread upload5 viewsImage uploaded in thread 157943
|
|

Thread upload5 viewsImage uploaded in thread 157943
|
|
Thread upload6 viewsImage uploaded in thread 157943
|
|

Thread upload7 viewsImage uploaded in thread 157943
|
|

Thread upload7 viewsImage uploaded in thread 157943
|
|
Thread upload7 viewsImage uploaded in thread 157943
|
|

LR3 maint schedule - original13 viewsSchedule is at launch in mid 2000s. May have been revised since. This is the LR shop scheulde.
|
|

121 views
|
|

Maintenance Check Sheet215 views
|
|
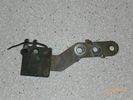
Radio Noise Suppression Capacitor NNW502820699 viewsThis is the radio noise suppression capacitor, part number LR020488 (previous NNW502820), that is mounted underneath and near the transmission. It is powered by fuse 10 amp F30E in the engine compartment. If F30E blows, (the fuse that also powers the transmission ECU), the problem is probably caused by the failed capacitor, not the ECU. A quick fix is just to disconnect the capacitor and replace the fuse as nothing bad seems to immediately result.
The above radio noise capacitor is not to be confused with LR004160, the ignition noise capacitor which is located under the black plastic engine cover on the right hand side above the air intake towards the rear of the engine.
The ignition capacitor is held on with a single 8mm bolt and a three wire electrical connector. Replacing the ignition capacitor as a routine maintenance prevention action at 100,000 miles, 160,000 km), has merit. It is a do it yourself kind of thing and easier to get at than the radio capacitor underneath.
|
|

Italian Maintenance Check Sheet136 viewsJLR 11 82 14_6E (6)
SCHEDA DI MANUTENZIONE (TUTTI I MODELLI REGNO UNITO ED EUROPA)
|
|

Italian Maintenance Check Sheet145 viewsJLR 12 05 14_6E (6)
SCHEDA DI MANUTENZIONE
|
|

Vehicle Maintenance Log for LR3/4 D3/4 or other1136 viewsThis is a Excel file that you can download and then modify to suit. It is very simple, but allows me to keep track of most maintenance and fixes etc on my LR3. All columns and rows and boxes can be edited.
I did not erase any data in the various boxes so you could see how I am using it - again not very fancy but it works for me. Under the brakes column, one will see f6 r5 which is how I keep track of the condition of the brake pads. The dealer records the pad thickness at each oil change so that is where the numbers come from.
f is for Front Pads, 6 is for 6mm; r is for Rear pads, 5 is for 5 mm. New pads are about 10 mm; replacement is at 3 mm or less. The amber coloured brake wear dash warning light should come on at about 2 mm.
|
|

ZF LifeguardFluid6 transmission oil.1397 viewsThis is an interesting pdf in that under the ZF 6HP26 six speed section, it provides the various automobile manufacturer part numbers for their version of the appropriate tranny oil, all of which seems to be the LifeguardFluid6 oil, ZF part number S671 090 255. Note the fine print and do not confuse it with the LifeguardFluid6 Plus oil for vehicles with the Torsen AWD setup such as the Audi Quattro, VW 4Motion vehicles and I think the BMW FF Range Rovers of an earlier time.
Also of interest at the bottom of the pdf is the recommendation for replacing the transmission oil "between 80,000 km and 120,000 km or 8 years, depending on the load." I also do not see any reference to "sealed for life" but almost as optimistic, "maintenance free" but with the proviso "intended for normal operating conditions". This would most typically be the Sandringham Castle Grounds in the UK rather than Cape York, QLD.
|
|

ZF 6HP26 and 6HP28 Comparison plus oil pan and filter replacement options963 viewsThis is a 66 page ZF produced pdf that provides comparisons between the various ZF transmissions; also instructions regarding maintenance of the Mechatronic unit, the round seal; the various metal and plastic pans available as well as tips regarding changing the oil.
This ZF pdf has a number of colour pictures and part numbers within as well.
|
|
|
|
|
|
|