Fuel Burning Heater
Discovery 3 TDV6 may be fitted with a Webasto Thermo Top V fuel burning heater, and is used in the Discovery 3 to provide auxiliary heating of the engine coolant during cold weather. This is largely to aid emissions and to speed up cabin warm up. The Discovery 4 may be fitted with the enhanced Thermo Top Vevo. Depending on model and accessories fitted it can be used as a fully functioning parking heater that can warm the interior, triggered by the timed climate setting or via an optional remote.
Contents
Fitment
Although fitted to all UK TDV6s, it is not fitted to all TDV6 vehicles in all markets.
Notably, those in "warm" climates are not equipped.
Automatic Operation - Smoke From Front of Vehicle
Outside air temp below 6 degrees C? Engine temp less than 75 degrees C? Low fuel warning light NOT on?
Then don't worry, its the Webasto Fuel Burning heater starting up.
The function of the heater is to assist the very efficient TDV6 to warm up on cold starts, by burning diesel fuel to directly heat the coolant in the engine. One problem with modern diesels is that they are so efficient that they don't produce enough heat to warm the coolant enough to ensure efficient running.
When it starts (after about 1 minute from initial engine start) it will emit some smoke and steam from the front of the front left wheel arch. As the FBH reaches max power, it will burn cleanly with no smoke. You should not see smoke for more than a minute or so. You should see the smoke emitting from a small vertical exhaust located forward of the left-side front wheel.
You cannot control the operation of the FBH on the D3 (unless you have modified it - see below), it is fully automatic.
Park Heater Functionality
Park heating is when the FBH is operated with the vehicle engine off, to warm up the engine coolant.
Very early Discovery 3's had park heater settings in the Settings Menu but this was removed as part of the Enhancement Programme in 2005.
There are many ways to retrofit park heater functionality to the D3's FBH.
- A Webasto 1533 (oval) timer can be fitted on its own to provide in-car push-button park heating without remote control.
- A modification to the Webasto 1533 timer allows remote operation by using a GSM module (with SIM card) and either a phone call or SMS text message. Alternatively a remote "plip" and receiver can be used in place of the GSM module.
- Site member stapldm has created comprehensive instructions for fitting a park heater timer, with an option for remote control, which effectively retrofits the park heater functionality.
- A kit is available from Danhag to operate the FBH and cabin fans from a phone call. A similar kit is available from Bell Auto Services.
- Land Rover released an official kit for the Russian Market, based on a Webasto 1533 timer.
- A self build kit developed by alex_pescaru is detailed in this thread
- A Webasto ThermoCall TC3 or TC4 GSM as explained by btekcan in this thread or by Robbie on his D4 in this thread *The Webasto Telestart remote control system cannot be used on a Discovery 3 FBH as the firmware on the FBH ignores commands from Telestart units. Discovery 4 FBH firmware is different and there is a factory Telestart option (Remote Park Heater).
See below for more information on these options.
Connecting to the FBH
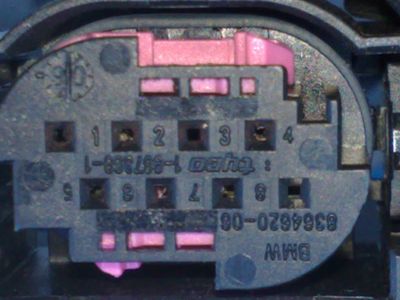
Connecting any controller or the Webasto diagnostics requires using the WBUS connection to the FBH. On the Thermo Top V this is available at pin 2 of the FBH's 8 pin connector.
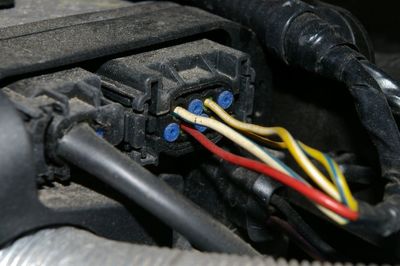
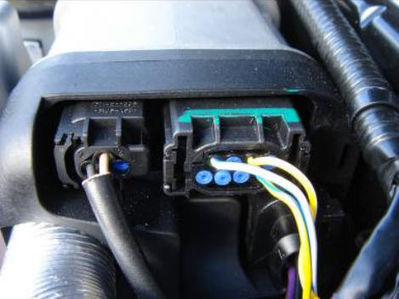
Only the very earliest Discovery 3's are factory-fitted with a WBUS control wire in pin 2 of the 8-pin FBH connector (a leftover from the deleted Settings menu functionality). This is the red wire in the photo on the left below.
All other D3s will require an wire adding as they have no red wire (right hand photo).
|
|
| Very early D3 with red wire fitted | Typical D3 with no red wire fitted |
|---|
D4s all have the red wire as standard and, depending on options, some may have an additional island valve that can select between heating the interior alone, or the engine itself:
If you need to add this wire, the site shop carries the correct, fully sealed terminals on a wire for an easy, robust and factory-quality connection.
.JPG)
Other wiring solutions generally require manually sealing a non-correct terminal into the 8 pin connector.
Fitting the control wire
Thanks for stapldm for these instructions:
- Remove the 8 pin connector from the FBH by squeezing the two side clips and pulling away from the FBH.
- From the connecting face (not the side with the wires emerging), using a stiff thin piece of wire or an opened out paperclip gently push the blanking plug out of the pin 2 hole.
- With reference to this photo:
Above the number 3 pin marking is a pink slider, which looks like this: - - · - Using your straightened out paperclip again gently press into the right hand side of the middle 'dash' (exactly above the number 3) so that the paperclip is at 45 degrees and pushing towards the 'dot'.
- The pink slider should move a couple of mm until the latch bump that was at the right of the second dash ends up in the dot. The slider is now in the "unlocked" position.
- Look for the barb on the terminal you're about to fit. When you fit it, the barb points towards the pink slider.
- Fit the connector into hole number 2 from the wire side. You will hear it "click" when it is correctly fitted.
- Using your straightened out paperclip gently press into the 'dot' so that the paperclip is at 45 degrees and pushing towards the middle 'dash' to return the pink slider to the "locked" position.
Webasto 1533 Timer and modifications
As above Stapldm compiled an excellent and very easy to follow write up on how to carry out a
Following on from Stapldm's work Wiggs went a step further for the technophiles by perfecting a
Much later jdhx added details of his implementation using a two button remote to give an on and off button with audible and visual indication of the state of the FBH. This included wiring diagram, parts list (with an alternative source of the oval timer plug) and photo.
Oval timer plugs are now available from the site shop
.jpg)
Danhag
A kit is available commercially from Danhag in Germany to operate the FBH as a park heater and the cabin fans to warm the interior. See Danhag FBH Kit Notes for installation, configuration and operation notes.
Bell Auto Services
BAS supply a controller with diagnostic functionality built in.
See https://www.disco3.co.uk/forum/post815538.html#815538
As of April 2012 a GSM upgrade is now available for the BAS controller.
Build your own
Site member alex_pescaru has developed and released circuit diagrams and software for a DIY controller using the Land Rover button on the key fob.
See https://www.disco3.co.uk/forum/topic106191.html
Russian Market Kit
Land Rover did release an option for a pre-heat/cabin warmer timer (Webasto based) to be fitted in cold climates.
Speak to your dealer for information, though it was only released for Russia and is difficult to obtain as a kit in other markets.
Webasto Telestart T91
The Webasto T91 Telestart receiver will not control the Discovery 3 FBH: https://www.disco3.co.uk/forum/post1102351.html#1102351
This is because Discovery 3 FBH's firmware ignores commands from the Telestart.
It will control the Discovery 4 FBH, as a T91 Telestart system is a factory option (Remote Park Heater). The D4 is fitted with a ThermoTop V EVO FBH, different from the D3 ThermoTop V and using different firmware.
Webasto ThermoCall TC3 and TC4
Unlike the Telestart units, these GSM equipped FBH controllers do work with the FBH in a Discovery 3 as well as the Discovery 4. See this thread for the D3 and this thread for the D4.
The example TC4 is shown below connected directly to Robbie's D4 FBH for testing purposes. When installed the unit lives hidden behind the RH rear panel in the boot:
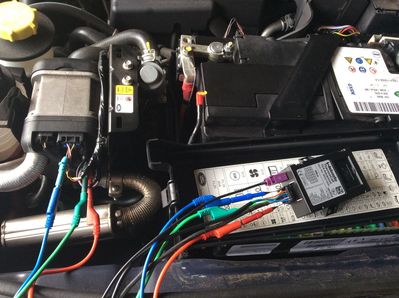
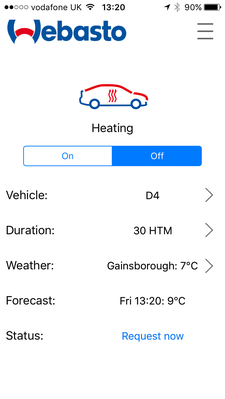
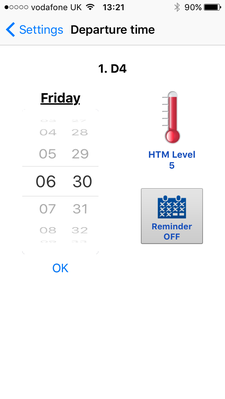
The unit itself can be controlled by text messaging or the free Webasto App:
Resetting
You may be able to reset a "locked out" (non operational) FBH by removing the power supply from it for a few minutes.
- Turn the engine off, ignition off and remove the key.
- Either:
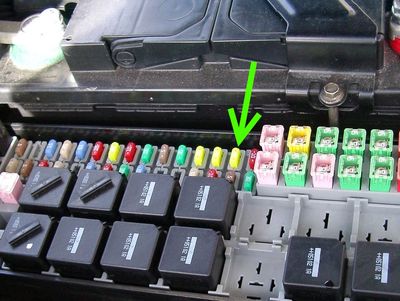
- remove Fuse 28 from the engine bay fuse box:
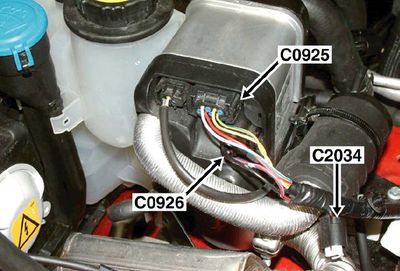
- or remove the two-pin connector (C0926 in this photo) from the FBH. The blade of the D3 key can help to remove the clip:
- remove Fuse 28 from the engine bay fuse box:
- Remove one of these and replace after a minute or so.
If this does not reset your FBH then you may have a more complicated error which requires diagnostics. To read and clear these fault(s) you should use one of the diagnostic methods below.
Diagnostics
The FBH unit can be diagnosed using the (free) Webasto software and either a custom made loom or by wiring the WBUS back to the vehicle's OBD port.
Diagnostic looms are available in the site shop:
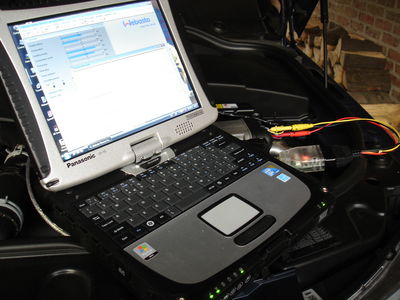
To use the Webasto ThermoTest software you will need a basic USB to OBD K-line adapter. These are listed on eBay as KKL or 409 adapters, often for Volkswagen Group cars. This adapter is the sort of thing: Click Here or Click Here

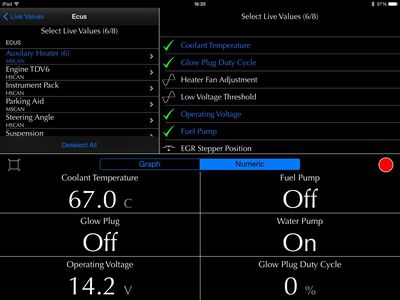
The FBH can also be diagnosed with a Land Rover specific fault code reader - e.g. GAP IIDTool, Faultmate MSV2, Nanocom, Autologic or SSD. These connect to the OBD port on the car (under the steering wheel), not directly to the FBH.
However these tools do not have the full range of diagnostic or test functionality of the ThermoTest software.
Typical IIDTool FBH screenshot:
Further topics
- https://www.disco4.com/forum/topic123417.html
- https://www.disco3.co.uk/forum/topic42516.html
- https://www.disco3.co.uk/forum/topic43944.html
Thermo Test Software
The Webasto Thermo Test (WTT) runs on Windows only.
- Thermo Test software installer v2.14 ** USE THIS UNLESS OTHERWISE ADVISED **
- Thermo Test software ZIP v2.16.1
- Thermo Test software installer v3.0
- Thermo Test software installer v3.4
- v2.14 User Manual
A WTT v2 setup guide is available here: Webasto_Thermo_Test_Setup
The v2.16.1 software should be unzipped, then run WTT.exe directly to start Thermo Test. Otherwise the guide above can be used.
It has been reported that the v2.16.1 software is required to start the heater on a Discovery 4 rather than v2.14
For more see https://www.disco3.co.uk/forum/post1867644.html#1867644
Diagnostic Loom
Details of the diagnostic loom have been supplied by IanNP here: https://www.disco3.co.uk/forum/post616222.html#616222
Looms can also be bought ready-made from the site shop:
Wiring Diagram (click to zoom):
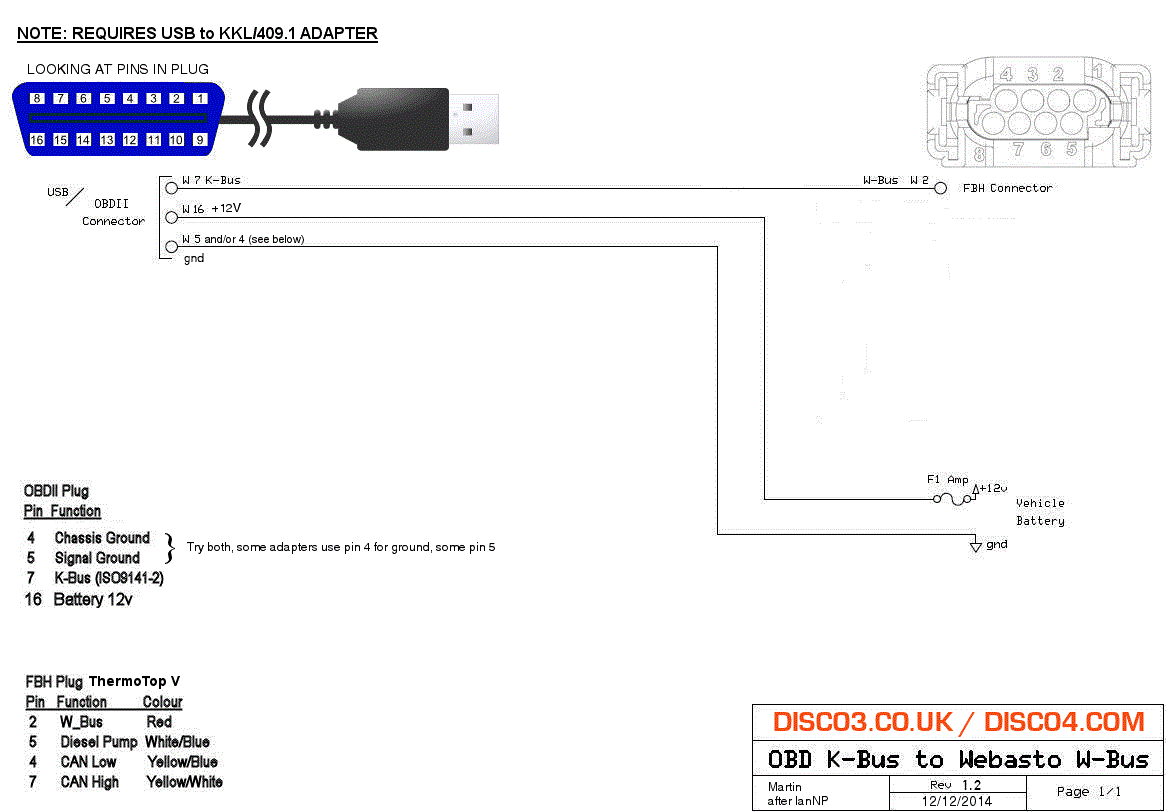
This diagram assumes you do NOT remove the 8 pin plug from the FBH. You can remove it to do fault clearing, but for testing operation the fuel pump must be connected to the FBH and this is the white/blue wire on the 8 pin plug. So keep the 8 pin plug fitted where possible.
Some members have noted that with some OBD adapters the ground connection should be made to pin 4 instead of pin 5, this is now mentioned in the diagram
Wiring to OBD port
Note: photos and more details to follow, if any questions in the meantime please email martin@disco3.co.uk
After connecting to the FBH as above, extend the wire through the bulkhead and down to the OBD port under the steering wheel.
You then need to join this to an additional OBD port terminal wire, available from the site shop:
This terminal should then be fitted to cavity number 7 in the diagnostic connector, which is empty from the factory.
The connector is located underneath the steering wheel and above the pedals, and is accessed (for fitting the additional wire) by removing the footwell closing panel (a few screws).
(Photos of removing OBD port and fitting wire to follow)
You can then use the USB/OBD adapter mentioned above to plug straight into the diagnostic port and the Webasto software to diagnose the FBH.
Webasto Fault Codes
See WTT Fault Codes
Quick Function Check
You can quickly check that your FBH is working as intended by the factory by getting the external temperature sensor cold. Either remove it and place in the freezer for 15 minutes, or use a "cold spray" or air duster to chill the sensor in situ.
Check the external temperature in the dash display is below 6 degC, then start the engine. Assuming you have sufficient fuel and the engine is cold or cool, the FBH will start or attempt to start.
A non functioning or partly functioning FBH will require further diagnostics and/or resetting/servicing.
Servicing
Should you have a faulty FBH which is not fixed by clearing the faults or lock out - i.e. it is not starting or is belching smoke on start, then you may want to service it.
The workshop manual for the ThermoTop V is available here: https://www.disco3.co.uk/gallery/albums/userpics/24044/Disco_3_FBH_Workshop_Manual_Thermo_Top_V.pdf
The workshop manual will assist in disassembling the heater, see Section 9 onwards.
The burner is commonly clogged with soot, this should be cleared out after removing the delicate injector.
See this thread for a photo of the burner: https://www.disco3.co.uk/forum/topic117926.html
I have today successfully revived a non-starting FBH using the workshop manual section 9, and cleaning the ceramic cone inside the burner assembly as in the photo in the thread above. I used isopropanol on a cotton bud. Martin 16:23, 19 December 2014 (GMT)
Robbie has now posted a guide to servicing: https://www.disco3.co.uk/forum/topic136766.html
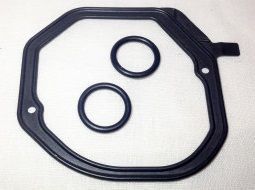
The main gasket and water outlet O rings are available as a kit from any Land Rover parts dealer for ~£5 as part number LR004141
Contents: